
Properly securing your tent is crucial for a safe and comfortable camping experience. This guide provides clear, step-by-step instructions on how to tie essential tent stake knots. Learning these basic knots will ensure your tent remains stable, even in challenging weather conditions, allowing you to enjoy your outdoor adventures with peace of mind.
Are you ready to take your camping game to the next level? One of the most fundamental, yet often overlooked, skills in camping is knowing how to properly secure your tent. This isn’t just about hammering a stake into the ground; it’s about creating a stable and resilient shelter that can withstand the elements. And at the heart of a securely pitched tent lies the humble tent stake knot.
Many campers, especially beginners, might not give much thought to the knots they use. They might simply loop the guy line around a stake and hope for the best. However, a poorly tied knot can loosen, leading to a flapping tent, a collapsed shelter, or worse, damage to your gear. Learning a few key tent stake knots will make a world of difference.
In this comprehensive guide, we’re going to walk you through everything you need to know about tying tent stake knots. We’ll cover the most effective and reliable knots, break down the steps for tying them, and offer practical tips to ensure your tent stays put, no matter what the weather throws at you. By the end of this guide, you’ll be confident in your ability to secure your tent like a pro.
Key Takeaways
- Mastering the Bowline Knot: This versatile knot is excellent for creating a secure loop around your tent stake.
- Understanding the Clove Hitch: A reliable knot for attaching guy lines to tent stakes, especially when adjustability is needed.
- The Figure-Eight Knot’s Simplicity: A straightforward and secure knot for creating a stopper or loop on your guy line.
- Importance of Tension: Always ensure your knots are snug but not so tight they damage the cordage.
- Practice Makes Perfect: Regularly practicing these knots will build muscle memory and confidence for when you’re actually out camping.
- Choosing the Right Cordage: Using durable, weather-resistant cordage is vital for the longevity and security of your tent stake knots.
Why Tent Stake Knots Matter
Before we dive into the knots themselves, let’s briefly touch upon why they are so important. Your tent is your home away from home when you’re out in nature. It provides shelter from rain, wind, sun, and insects. The stakes and guy lines are what anchor your tent to the ground. If these anchors fail, the integrity of your shelter is compromised.
A well-tied tent stake knot ensures that:
- Your tent remains taut and stable.
- Guy lines don’t slip or loosen during the night.
- Your tent can better withstand wind gusts.
- You can adjust tension easily when needed.
- Your gear is protected from the elements and potential damage.
Think of it as the foundation of your campsite. A strong foundation means a secure and comfortable experience. If you’re planning an extended trip, you might also be interested in checking out options for the [best camping mattress for tent](https://tentrm.com/best-camping-mattress-for-tent/) to maximize your comfort.
Essential Knots for Tent Stakes
There are many knots out there, but for tent staking, we want to focus on those that are reliable, easy to tie (even in the dark or with cold hands), and secure. Here are a few of the most popular and effective knots you should know:
1. The Bowline Knot
The bowline knot is a classic for a reason. It creates a fixed loop at the end of a rope that won’t slip. This makes it perfect for creating a secure attachment point to your tent stake.
When to Use It: Ideal for creating a permanent loop on the end of your guy line that you can then attach to the stake or a carabiner connected to the stake.
How to Tie the Bowline Knot:
Step 1: Make a ‘Rabbit Hole’
Take the working end of your rope (the end you are tying with). Make a small loop in the standing part of the rope. This loop is often called the ‘rabbit hole’. The working end should be on top of the standing part when you make this loop.
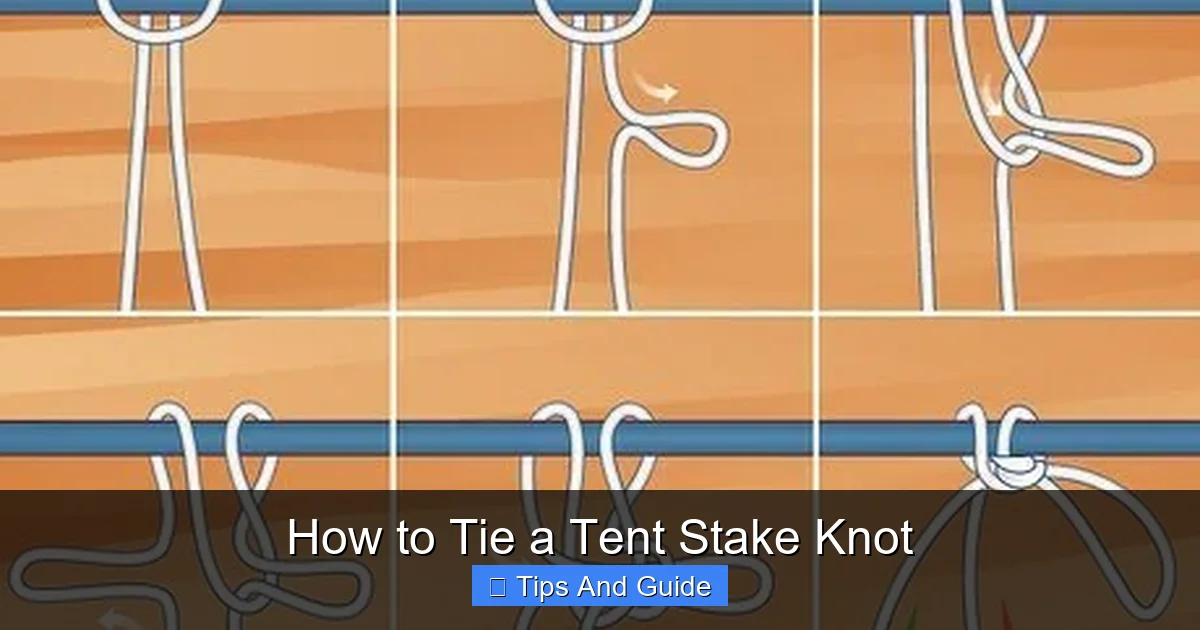
Visual guide about How to Tie a Tent Stake Knot
Image source: wikihow.com
Step 2: The Rabbit Comes Out of the Hole
Take the working end and bring it up through the ‘rabbit hole’ from underneath.
Step 3: Around the Tree
Now, bring the working end around the standing part of the rope (this is like the ‘tree’ in the rhyme).
Step 4: Back Down the Hole
Finally, bring the working end back down through the ‘rabbit hole’.
Step 5: Tighten the Knot
Hold the loop that you’ve created and the two ends of the rope. Pull them away from each other to tighten the bowline knot. You should end up with a secure, non-slipping loop.
Tip: The bowline is known for being relatively easy to untie, even after being under a lot of tension. This is a big advantage when you’re packing up camp.
2. The Clove Hitch
The clove hitch is a simple and effective knot for temporarily attaching a rope to a pole or stake. It’s particularly useful if you need to adjust the tension of your guy lines frequently.
When to Use It: Excellent for quickly securing a guy line to a tent stake, especially when you might need to adjust its length or tension. It’s also good for attaching the line to a tent pole.
How to Tie the Clove Hitch:
Step 1: First Hitch
Wrap the rope around the stake. Cross the working end over the standing part. This creates your first hitch.
Step 2: Second Hitch
Wrap the rope around the stake again, in the same direction. This time, tuck the working end under the second wrap you just made.
Step 3: Tighten the Knot
Pull both ends of the rope to tighten the clove hitch against the stake. It should look like two loops tightened around the stake.
Tip: The clove hitch can sometimes slip on very smooth surfaces. Ensure your stake has some texture or consider tying a half-hitch around the standing part for extra security if you’re concerned about slippage.
3. The Figure-Eight Knot (Loop)
The figure-eight knot is a fundamental knot used to create a stopper knot or a loop. For tent staking, a figure-eight loop is a reliable way to create an attachment point.
When to Use It: Great for creating a secure loop at the end of a guy line that you can then attach to your tent stake. It’s very easy to see and untie.
How to Tie the Figure-Eight Loop:
Step 1: Create a Bend
Form a bight (a fold in the rope) in the rope, creating a large loop. Make sure the working end is on top.
Step 2: Wrap Around the Standing Part
Take the working end and wrap it around the standing part of the rope, creating a figure-eight shape.
Step 3: Pass Through the Loop
Bring the working end up and over the standing part, then down through the original loop you created.
Step 4: Tighten the Knot
Pull the working end and the standing part to tighten the knot. The resulting knot should resemble the number ‘8’.
Tip: The figure-eight knot is much stronger and easier to untie than a simple overhand knot, making it a superior choice for creating a loop.
Tying Knots to Your Tent Stakes: Practical Application
Knowing the knots is one thing, but applying them effectively to your tent stakes is another. Here’s how to put your new knot-tying skills to work:
Using Stakes with Holes or Notches
Many modern tent stakes come with pre-drilled holes or notches. These are designed to make attaching your guy lines easier and more secure.
Step 1: Thread the Guy Line
Thread the end of your guy line (where you’ve tied your chosen knot, like a bowline or figure-eight loop) through the hole or around the notch on the tent stake.
Visual guide about How to Tie a Tent Stake Knot
Image source: ae01.alicdn.com
Step 2: Secure the Loop
If you tied a loop, pass the loop through itself to create a slip knot that tightens around the stake. For a bowline or figure-eight loop, you can simply hook the loop onto the stake if it has a suitable prong or hook. If it’s just a hole, you might need to pass the loop through and then secure it with another knot or simply let it rest against the stake.
Step 3: Adjust Tension
Use a tensioner or adjust the length of your guy line to achieve the desired tautness. For stakes with notches, the clove hitch can be useful here for easy adjustment.
Using Stakes Without Holes (Simpler Stakes)
Some basic tent stakes might just be simple pointed pegs. In this case, you’ll need to rely on wrapping the guy line securely.
Step 1: Wrap the Guy Line
Wrap the guy line around the body of the stake several times. A good method is to use a series of half-hitches or a modified clove hitch.
Step 2: Create a Secure Binding
Ensure the wraps are tight and the working end is secured so it doesn’t unravel. You can tie off the end with a simple overhand knot around the standing part.
Step 3: Tensioning
Pull the guy line to create tension. You might need to reposition the stake slightly to get the optimal angle and depth into the ground.
Tips for Secure Tent Staking
Beyond just tying the right knots, there are several other factors that contribute to a secure tent setup:
- Choose the Right Stakes: Different ground conditions require different types of stakes. For soft ground, consider longer, wider stakes or those with a Y-shape for better holding power. For rocky ground, shorter, sturdier stakes might be necessary. If you’re heading to a place known for challenging terrain, research the [best campgrounds for tent camping](https://tentrm.com/best-campgrounds-for-tent-camping/).
- Proper Stake Angle: For maximum holding power, drive your stakes into the ground at a 45-degree angle, leaning away from the tent. This uses the earth’s resistance to its fullest.
- Ground Conditions: Soft, wet ground offers less holding power than firm, dry soil. In soft conditions, you might need to use more stakes, longer stakes, or find natural anchors like rocks or trees to supplement your guy lines.
- Guy Line Tension: Guy lines should be taut enough to hold the tent firmly, but not so tight that they put excessive stress on the tent fabric or stakes. You want a balance between stability and flexibility.
- Location, Location, Location: Choose a flat, well-drained spot for your tent. Avoid pitching under dead trees or branches that could fall.
- Practice in Good Weather: Don’t wait for a stormy night to practice your knot-tying. Set up your tent in your backyard or a park on a nice day to get comfortable with the process.
- Consider Additional Anchors: For very windy conditions, consider using rocks or logs to further anchor your stakes or guy lines.
- Cordage Quality: The strength and durability of your guy lines are just as important as the knots. Invest in good quality, UV-resistant cordage that won’t fray or break easily.
Troubleshooting Common Tent Staking Issues
Even with the best knots, you might encounter problems. Here are a few common issues and how to address them:
Problem: Stakes Pulling Out of the Ground
Solution: Ensure you are driving your stakes at a 45-degree angle away from the tent. If the ground is very soft, try using longer stakes, stakes with a wider surface area, or supplement with additional anchoring methods like tying guy lines to heavy rocks or logs.
Visual guide about How to Tie a Tent Stake Knot
Image source: ae01.alicdn.com
Problem: Guy Lines Loosening in Wind
Solution: Check that your knots are secure and haven’t slipped. If using a clove hitch, consider adding a half-hitch for extra security. Ensure you’ve achieved adequate tension initially. Sometimes, re-tensioning the guy lines as the ground shifts or the wind picks up is necessary.
Problem: Tent Fabric is Sagging
Solution: This indicates that your guy lines are not taut enough. Re-tension them to pull the fabric taut. Ensure your stakes are firmly in the ground to provide the necessary anchor point.
Problem: Knots are Difficult to Untie After Use
Solution: This often happens when knots get wet and then dry, or when they are subjected to extreme tension. The bowline and figure-eight knots are generally easier to untie than simpler knots. Avoid over-tightening knots, especially when they are new. If a knot is very stubborn, try wiggling it gently or using a twig to loosen it before pulling hard.
Conclusion
Learning to tie a tent stake knot is a small skill that yields significant rewards in camping comfort and safety. The bowline, clove hitch, and figure-eight knot are your go-to choices for creating secure and reliable anchor points for your tent. They are simple to learn, effective in practice, and will give you the confidence to pitch your tent in a variety of conditions.
Remember that practice is key. The more you tie these knots, the more instinctual they will become. So, the next time you head out for a camping trip, whether it’s a quick overnight or a longer expedition, you’ll be well-equipped to ensure your tent remains a secure and welcoming haven. Happy camping!