
Enhance your camping experience by learning how to set up a tarp over your tent. This guide provides step-by-step instructions to create a waterproof and windproof shelter, ensuring you stay dry and comfortable in any weather. We cover everything from selecting the right tarp and materials to advanced setup techniques for maximum protection.
How to Set Up Tarp Over Tent
Camping is an incredible way to connect with nature, but it can quickly turn unpleasant if you’re caught in a downpour or relentless wind. That’s where a simple, yet incredibly effective, addition to your camping gear comes in: a tarp. Setting up a tarp over your tent isn’t just about adding an extra layer of protection; it’s about creating a more comfortable and secure outdoor living space. Whether you’re an experienced camper or just starting out, understanding how to properly set up a tarp over your tent can dramatically improve your experience.
This comprehensive guide will walk you through everything you need to know, from selecting the ideal tarp to mastering various setup techniques. We’ll cover the essential gear, step-by-step instructions, and practical tips to ensure your tent and its overhead cover can withstand the elements.
Key Takeaways
- Choose the Right Tarp: Select a tarp that is larger than your tent, made of durable, waterproof material like ripstop nylon or polyester, and consider one with reinforced grommets.
- Gather Necessary Gear: You’ll need your tent, the chosen tarp, sturdy stakes, strong cordage (like paracord), and optional items like adjustable poles or carabiners.
- Site Selection is Crucial: Pick a level spot for your tent, and ideally, a location that offers some natural windbreak or overhead cover if possible.
- Basic A-Frame Setup: This is the most common method. You’ll string a ridgeline from one point to another, drape the tarp over it, and stake down the edges to create a peaked roof.
- Lean-To Setup for Wind Protection: Position the tarp so one side is lower than the other, creating a sloped surface to deflect wind and rain away from the tent entrance.
- Consider a Purlin Line: For a more robust setup, a second line (purlin) can be added to support the tarp ridgeline, preventing sagging.
- Regular Maintenance is Key: Always inspect your tarp for damage before and after each use, and ensure it’s completely dry before storing to prevent mildew.
Why Set Up a Tarp Over Your Tent?
Before we dive into the how-to, let’s quickly touch on why this practice is so beneficial:
- Enhanced Waterproofing: Tents, even those designed to be waterproof, can eventually soak through under prolonged or heavy rain. A tarp acts as a primary barrier, keeping your tent’s rainfly dry and significantly reducing the chance of leaks.
- Improved Insulation: The air gap between the tarp and your tent can provide a slight insulating effect, helping to keep you warmer on cooler nights and cooler on hot days.
- Wind Protection: A well-pitched tarp can deflect wind, reducing the direct impact on your tent and making for a quieter and more stable sleeping environment.
- Shade: On sunny days, a tarp can offer valuable shade, helping to keep your tent cooler.
- Extended Shelter Area: You can set up the tarp to create a covered porch area in front of your tent, providing a dry space to sit, cook, or store gear.
- Protection from Debris: It can shield your tent from falling pine needles, branches, or other debris.
What You’ll Need: Gear Essentials
To successfully set up a tarp over your tent, you’ll need a few key items. Ensure you have these before you head out:
1. The Tarp
This is the star of the show. When choosing a tarp, consider:
- Size: It should be significantly larger than your tent. A good rule of thumb is to have at least a foot of overhang on all sides, if not more.
- Material: Look for durable, waterproof, and lightweight materials. Ripstop nylon and polyester are common choices. Polyethylene tarps are inexpensive but can be heavier and less durable.
- Waterproof Rating: Check the hydrostatic head rating (HH) if available; higher numbers mean better waterproofing.
- Reinforced Grommets: These are metal rings around the edges that allow you to secure the tarp with stakes and cordage. Ensure they are strong and well-placed.
- Shape: Rectangular tarps are the most versatile. Hexagonal or square tarps are also available and can be good for specific setups.
2. Your Tent
The size and shape of your tent will influence how you position the tarp.
3. Cordage
You’ll need strong, durable cordage to string up the tarp. Paracord is an excellent choice due to its strength and versatility. Aim for at least 50 feet to give yourself plenty of options.
4. Stakes
Sturdy tent stakes are crucial for anchoring the tarp securely to the ground. Bring extras, as you’ll likely need more than for just your tent.
5. Optional Gear
Depending on your setup, you might also find these useful:
Visual guide about How to Set Up Tarp Over Tent
Image source: i.ytimg.com
- Adjustable Tarp Poles: These can be used to create higher points for your tarp ridgeline, providing more headroom and a more stable structure.
- Carabiners: These can simplify attaching cordage to grommets or creating tensioners.
- Tree Straps: If camping in a forested area, these allow you to anchor your tarp without damaging trees.
Choosing the Right Campsite
Before you even start setting up your tarp and tent, selecting the right campsite is paramount.
1. Level Ground
Always prioritize level ground for your tent. This prevents you from rolling downhill in your sleep and ensures water will drain away from your tent.
2. Natural Shelter
If possible, look for a spot that offers some natural protection from the wind and sun. This could be a cluster of trees or a natural depression. However, be mindful of potential hazards like dead branches (“widowmakers”) or areas prone to flooding.
3. Proximity to Anchor Points
Consider where you’ll anchor your tarp. Having sturdy trees or large rocks nearby can make certain setups much easier.
Step-by-Step: How to Set Up a Tarp Over Your Tent
There are many ways to set up a tarp over a tent, each with its own advantages. We’ll cover two of the most popular and effective methods: the A-Frame and the Lean-To.
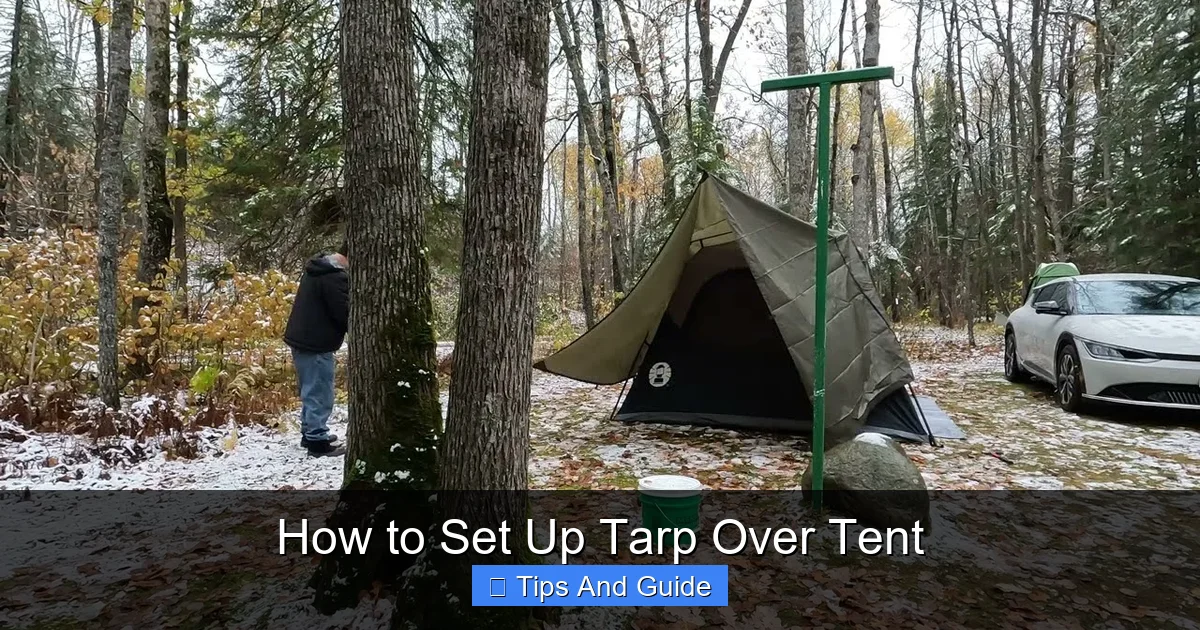
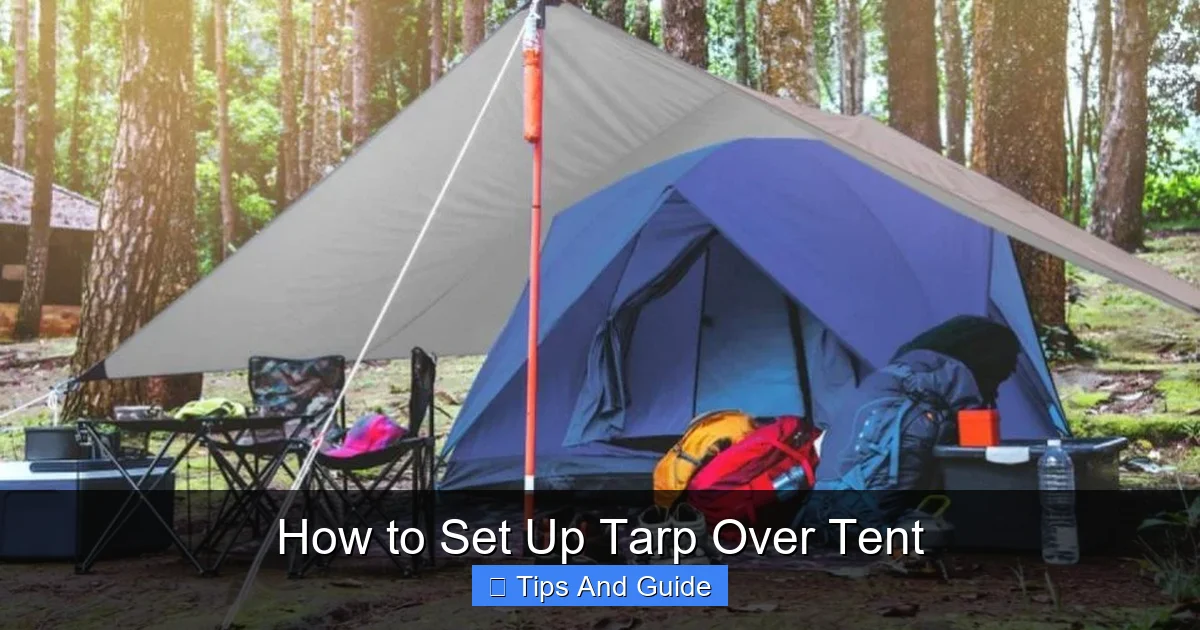
Method 1: The A-Frame Setup
This is the most common and versatile method, creating a peaked roof over your tent that sheds water and snow effectively. It’s ideal for general protection from rain and sun.
Step 1: Pitch Your Tent First
It’s usually best to set up your tent in its final location *before* you start rigging the tarp. This ensures your tent is positioned correctly and gives you a solid structure to work around. Make sure your tent is securely staked down.
Step 2: Create Your Ridgeline
The ridgeline is the backbone of your A-frame.
H3: Option A: Using Trees
If you have two sturdy trees spaced appropriately apart (wider than your tent), string a strong cordage line between them at the desired height. This height will determine your headroom and how steep the tarp’s pitch is. Aim for a height that allows you to stand comfortably underneath. Tie a secure knot, like a taut-line hitch, so you can adjust the tension later.
Visual guide about How to Set Up Tarp Over Tent
Image source: discoverthedinosaurs.com
Visual guide about How to Set Up Tarp Over Tent
Image source: i.pinimg.com
H3: Option B: Using Tarp Poles or Stakes
If trees aren’t available, you can use two adjustable tarp poles, or even sturdy tent poles if they’re tall enough. Drive the poles into the ground at the desired height and secure them. Alternatively, you can use your tent’s poles by extending them as high as possible and securing them. You can also create high anchor points using stakes, by driving them deep into the ground and attaching your cordage. This method requires more care to ensure stability.
Step 3: Drape the Tarp
Carefully unfold your tarp and drape it over the ridgeline. Ensure the ridgeline is roughly in the center of the tarp’s width. The tarp should hang down on both sides, creating the “A” shape.
Step 4: Stake Out the Sides
This is where you create tension and define the shape of your shelter.
H3: First Anchor Points
Pull one corner of the tarp away from the ridgeline and slightly forward (towards the direction you want rain to run off). Secure it to the ground with a stake. Repeat this for the opposite corner on the same side. Do the same for the other side of the tarp.
H3: Creating Tension
Now, pull the edges of the tarp away from the center ridgeline to create tension. You want the tarp to be taut, but not so tight that it rips the grommets. Use your cordage to tie from the grommets to additional stakes. You can create a more pitched roof by angling the stakes further out and using cordage to pull the tarp taut.
H3: Adjusting for Rain Flow
Think about the prevailing wind and where you want water to drain. You can adjust the stakes and cordage to create a steeper pitch on one side, or to ensure water runs away from your tent entrance.
Step 5: Secure the Ends
Finally, secure the open ends of your A-frame. You can stake them down directly to the ground, or use cordage to tie them to nearby trees or sturdy objects. Ensure there are no large gaps where wind and rain can easily enter.
Method 2: The Lean-To Setup
The lean-to is excellent for directing wind and rain away from your tent’s entrance, or for creating a sheltered cooking or sitting area. It’s simpler than the A-frame and uses fewer anchor points.
Step 1: Position Your Tent
Place your tent in its desired location, ideally with the entrance facing away from the expected direction of the wind and rain.
Step 2: Set Up Your Ridgeline
This setup typically requires a single high anchor point and a lower anchor point.
H3: Option A: Tree to Ground/Stake
Tie a cordage line to a tree or a sturdy tarp pole at a sufficient height. Run this line over the top of your tent, or just in front of it, and stake the other end to the ground. This creates your sloped ridgeline.
H3: Option B: Two Poles/Stakes
Use two tarp poles or stakes. Drive one into the ground at a higher point, and the other at a lower point, spaced appropriately. Tie your cordage between the tops of these two points to form your ridgeline.
Step 3: Drape the Tarp
Drape the tarp over the ridgeline so that one side is higher (attached to the higher anchor) and the other side slopes down and is anchored to the ground or a lower stake. The higher side should be facing the direction you want to protect your tent from.
Step 4: Stake Down the Lower Edge
Pull the lower edge of the tarp taut and stake it firmly to the ground. Use additional cordage and stakes to secure the sides, creating a stable, sloped roof. Ensure there are no large gaps.
Step 5: Secure the Higher Edge
If you used a tree or pole for the higher edge, ensure the cordage is taut and the tarp is securely attached. If you used two poles, make sure both are stable.
Advanced Tips and Techniques
Once you’ve mastered the basics, here are some ways to elevate your tarp setup:
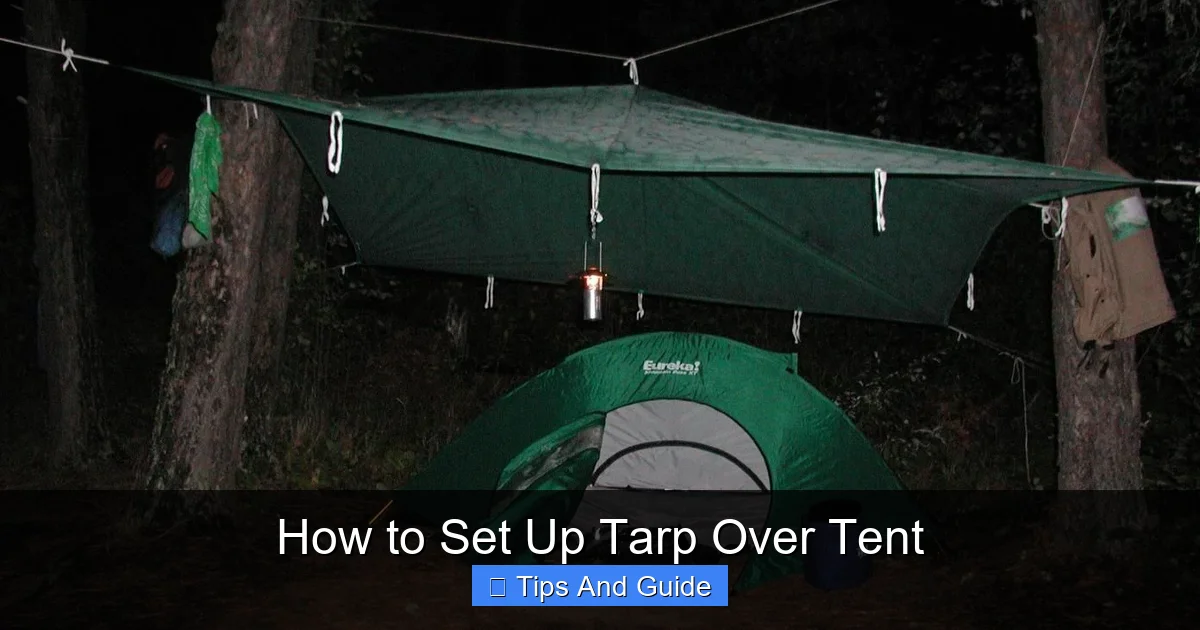
Using a Purlin Line
For a more robust A-frame, you can add a second ridgeline, known as a purlin. This runs parallel to your main ridgeline, a few feet below it, and is also anchored to trees or poles. You then drape the tarp over the main ridgeline and use cordage to attach the tarp to the purlin line. This prevents the tarp from sagging in the middle, especially under heavy rain or snow.
Creating a Front Porch
You can pitch your tarp so that it extends outwards beyond your tent’s entrance, creating a dry “porch” area. This is great for storing muddy boots, cooking in the rain, or just having a sheltered spot to relax. You might need additional poles or longer stakes for this.
Configuring for High Winds
In very windy conditions, orient your tarp so the lowest, most protected side faces the wind. Avoid creating large, flat surfaces that can catch the wind. A lower, more streamlined A-frame or a well-angled lean-to is often best. Ensure all your stakes are driven in at an angle for maximum holding power.
Double-Check Everything
Before you settle in, walk around your tarp setup. Tug on the stakes and cordage. Make sure everything is secure and taut. Check for any potential points of weakness.
Troubleshooting Common Issues
Even with the best intentions, you might run into a few problems. Here’s how to fix them:
Sagging Tarp
Cause: Not enough tension, or the ridgeline has stretched.
Solution: Re-tension your ridgeline and all the guy lines. If using a ridgeline strung between trees, use a taut-line hitch to easily adjust the tension. For heavier tarps or longer spans, consider a purlin line.
Water Pooling
Cause: Low spots in the tarp that aren’t draining.
Solution: Adjust the tension and angle of your stakes to create a steeper pitch. Ensure the entire tarp is angled so water flows off.
Stakes Pulling Out
Cause: Soft ground, or the stakes are not angled correctly.
Solution: Drive your stakes into the ground at a 45-degree angle away from the direction of pull. If the ground is very soft, you can try using larger or wider stakes, or even “deadman anchors” (burying an object like a rock or log and tying the cordage to it).
Wind Damage
Cause: Tarp is too taut, or the setup is not streamlined.
Solution: In high winds, it’s better to have a slightly looser tarp than one that’s going to rip. Release some tension if the wind is extremely strong. Ensure your setup is as low-profile and streamlined as possible.
Conclusion
Setting up a tarp over your tent is an essential skill for any camper who wants to ensure a comfortable and safe trip, regardless of the weather. By understanding the benefits, gathering the right gear, and practicing different setup techniques like the A-frame and lean-to, you can create a robust shelter that shields you from rain, wind, and sun. Remember to choose your campsite wisely and always double-check your setup for security. With a little practice, you’ll be an expert at setting up a tarp over your tent, transforming your camping trips from potentially miserable to wonderfully enjoyable. Don’t let unpredictable weather dictate your adventure; take control with a well-pitched tarp!