
Repairing tent mesh doesn’t have to be complicated or expensive. With the right tools and techniques, you can fix small tears and holes quickly, extending your tent’s life and keeping bugs out. This guide covers proven methods, from DIY patches to professional-grade solutions, so you stay comfortable on every adventure.
Key Takeaways
- Act fast on small tears: The sooner you repair a hole, the less likely it is to grow during your trip.
- Use mesh-specific patches: Regular fabric tape won’t stick well—opt for nylon or polyester mesh repair kits designed for tents.
- Seam grip or fabric glue adds strength: Applying a thin layer around the patch helps seal edges and prevent peeling.
- Reinforce high-wear areas: Doors, windows, and floor edges are prone to damage—consider preventive patches before problems start.
- Clean the area first: Dirt and moisture reduce adhesion—always wipe the mesh with alcohol or soap and water before patching.
- Test your repair at home: Don’t wait until you’re at the campsite—practice your fix beforehand to ensure it holds.
- Prevention beats repair: Store your tent dry and avoid dragging it over rough surfaces to minimize future damage.
📑 Table of Contents
Why Tent Mesh Damage Happens—and Why It Matters
Tent mesh is one of the most important yet fragile parts of your shelter. It keeps mosquitoes, flies, and other pests out while letting fresh air flow through—making it essential for comfort, especially in warm weather. But because it’s made of fine nylon or polyester threads, it’s also prone to snags, tears, and wear from friction, sharp objects, or even zippers.
Ignoring a small hole might seem harmless, but it can quickly turn into a big problem. One tiny rip near the door can let in a swarm of bugs overnight, ruining your sleep and your trip. Worse, if the tear grows, you might need a full panel replacement—which is costly and time-consuming. That’s why knowing the best way to repair tent mesh isn’t just handy—it’s a skill every camper should have in their outdoor toolkit.
Assessing the Damage: When to Patch vs. Replace
Before you grab your repair kit, take a close look at the damaged area. Not all mesh tears require the same fix. Small punctures (under ¼ inch) from thorns or gear straps are usually easy to patch. Larger rips—especially those longer than an inch or located along stress points like zipper lines—may need more robust reinforcement.
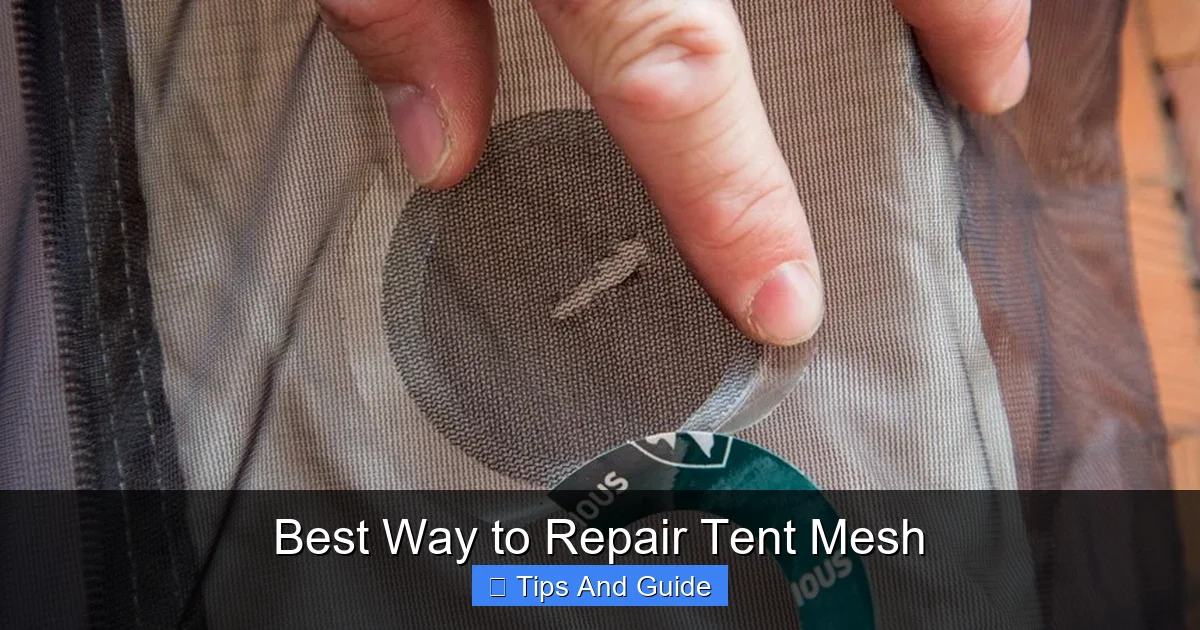
Visual guide about Best Way to Repair Tent Mesh
Image source: outdoorwithj.com
Signs You Can DIY It
- Holes are clean-edged and less than 1 inch wide
- The surrounding mesh is still taut and undamaged
- No fraying or unraveling beyond the immediate tear
When to Consider Replacement
- The entire panel is sagging or heavily frayed
- Multiple tears are clustered in one area
- The tent is old and showing general wear
If you’re unsure, start with a patch. Even if it’s not permanent, it’ll buy you time until you can get a professional repair or replacement. And remember: fixing mesh early is always easier than dealing with a full-blown infestation of no-see-ums in the middle of the forest!
Top 4 Methods for Repairing Tent Mesh
There’s no single “right” way to fix torn tent mesh—but some methods work better than others depending on your situation, available tools, and how long you need the repair to last. Below are the four most effective techniques used by seasoned campers and outdoor guides.
1. Mesh Repair Patches (Best for Most Situations)
Pre-cut mesh patches are the gold standard for quick, reliable fixes. These self-adhesive or heat-activated patches come in clear or matching colors and are designed specifically for tent screens. Brands like Gear Aid’s Tenacious Tape Mesh or Ripstop by the Roll offer durable options that blend seamlessly.
To apply: Clean the area with rubbing alcohol, let it dry completely, cut the patch slightly larger than the hole, and press it firmly over the tear. For extra hold, use a clothes iron on low heat (with a cloth barrier) to activate heat-sensitive adhesives. This method works great for doors, windows, and vents—and can last for multiple seasons if applied correctly.
2. Liquid Mesh Repair (Great for Tiny Holes)
For pinprick holes or fine abrasions, liquid mesh repair solutions like Seam Grip or McNett’s Tent Mesh Repair are ideal. These flexible sealants dry clear and bond tightly to synthetic fabrics without stiffening the material.
Simply apply a thin layer over the damaged spot using the included brush or a toothpick. Let it cure for 24 hours before use. This method is invisible once dry and won’t peel off easily—even after folding and packing your tent. It’s perfect for preventive maintenance too; dab a little on high-wear zones before your next trip.
3. Sew-On Patches (For Heavy-Duty Fixes)
If you’re handy with a needle and thread, sewing a patch offers maximum durability. Use a lightweight nylon patch (cut from an old tent or repair kit) and a whipstitch or running stitch around the edges. Choose UV-resistant thread to prevent degradation from sun exposure.
This method takes longer but creates a nearly invisible repair that moves with the mesh. It’s especially useful for large tears or when adhesive patches might not stick due to dirt or moisture. Just be careful not to pull too tight—you don’t want to distort the surrounding fabric.
4. Duct Tape (Only as a Last Resort!)
We’ve all been there: stranded at camp with a torn screen and no repair kit. In emergencies, a small piece of clear duct tape can act as a temporary barrier against bugs. But avoid colored or heavy-duty tapes—they leave sticky residue and can damage delicate mesh over time.
Use this only for one-night trips. As soon as you get home, replace it with a proper patch. And never rely on duct tape in humid or rainy conditions—it loses adhesion quickly when wet.
Step-by-Step Guide to Patching Tent Mesh Like a Pro
Now that you know your options, here’s a simple, foolproof process to ensure your repair lasts:
- Clean the area: Wipe the torn section with isopropyl alcohol or mild soap and water. Let it dry completely—any moisture will weaken the bond.
- Trim loose threads: Use small scissors to carefully cut away frayed edges. This prevents further unraveling.
- Choose your patch: Match the patch size to the hole—extend at least ½ inch beyond the tear on all sides.
- Apply the patch: For adhesive patches, peel and press firmly. For heat-activated ones, use an iron on low (no steam!) with a protective cloth.
- Seal the edges: Add a tiny drop of seam sealer around the patch perimeter to lock it in place.
- Cure before use: Wait at least 2–4 hours (or as directed) before packing or using your tent.
Pro tip: Keep a mini repair kit in your camping pack. Include a few patches, a small bottle of seam sealer, scissors, and alcohol wipes. It weighs almost nothing but could save your entire trip.
Preventing Future Mesh Damage
The best way to repair tent mesh is to avoid needing repairs in the first place. A little prevention goes a long way in extending your tent’s lifespan and keeping your nights bug-free.
Handle With Care
Always zip and unzip tent doors slowly. Rushing can catch the mesh in the zipper teeth, causing immediate tears. If you have kids or pets, teach them to avoid leaning or climbing on screened panels.
Store Properly
Never pack a damp or dirty tent. Mildew weakens fibers, and gritty dirt acts like sandpaper over time. After each trip, shake out debris and let it air-dry completely before folding. Store it loosely in a breathable bag—not compressed in its original stuff sack.
Use a Footprint
Laying a footprint or groundsheet under your tent reduces abrasion between the floor and rough terrain. This also protects lower mesh panels from rocks, roots, and sharp objects.
Inspect Regularly
Before every camping trip, do a quick visual check of all mesh panels. Spotting a tiny hole early means you can fix it at home with full tools and lighting—not by headlamp at midnight.
And if you’re camping in bug-heavy areas, consider pairing your repaired mesh with other strategies. For example, using the best way to keep bugs out of tent methods like permethrin-treated gear or mesh liners can reduce pressure on your screens.
When to Call in the Experts
Most mesh repairs are DIY-friendly, but sometimes it’s smarter to seek professional help. If your tent is high-end (like a MSR or Big Agnes model) or under warranty, contact the manufacturer. Many offer repair services or sell replacement panels at reasonable prices.
Local outdoor gear shops often provide patching services too—especially in hiking-heavy regions. They’ll use industrial-grade adhesives and precision tools for a nearly invisible finish. While it costs more than a $5 patch kit, it’s worth it for sentimental or expensive tents.
Finally, if you’re planning a long backpacking trip or expedition, consider reinforcing critical areas ahead of time. Adding preventive patches to door corners and window edges can prevent mid-trip disasters. After all, staying comfortable in the wilderness starts with a well-maintained shelter—and that includes knowing the best way to keep your tent cool and bug-free.
Conclusion
Learning the best way to repair tent mesh empowers you to extend your gear’s life, save money, and enjoy uninterrupted nights under the stars. Whether you’re fixing a tiny puncture with liquid sealant or sewing on a custom patch, these skills turn frustrating setbacks into quick fixes.
Remember: act fast, use the right materials, and prioritize prevention. With a little practice, you’ll handle mesh damage like a seasoned outdoorsperson. And when your tent stays intact, you can focus on what really matters—s’mores, stargazing, and the sound of crickets instead of mosquitoes buzzing through a hole in your screen. Happy camping!
Frequently Asked Questions
Can I use regular fabric tape to patch tent mesh?
No—regular fabric tape isn’t designed for fine mesh and may peel off or leave residue. Always use mesh-specific repair patches or liquid sealants made for synthetic tent materials.
How long does a mesh repair last?
A properly applied patch can last multiple seasons, especially if sealed with seam grip. Temporary fixes like duct tape should be replaced within a few uses.
Will a patch block airflow?
High-quality mesh patches are nearly invisible and maintain airflow. Avoid thick tapes or excessive sealant, which can stiffen the area and reduce ventilation.
Can I repair mesh while camping?
Yes! Many campers carry portable repair kits. Just ensure the area is clean and dry before applying the patch for the best adhesion.
What if the hole is near a zipper?
Reinforce the area with a larger patch and consider using a zipper guard to prevent future snags. If the zipper itself is damaged, it may need professional adjustment.
Is it worth repairing an old tent’s mesh?
If the frame and rainfly are still in good shape, yes—mesh repairs are cost-effective. But if the whole tent is worn out, investing in a new model may be smarter long-term.