
Putting a tarp over your tent is one of the smartest moves you can make for better weather protection and longer gear life. Whether you’re facing rain, sun, or wind, a well-placed tarp keeps your shelter dry and comfortable. This guide shows you the best way to put a tarp over a tent—step by step—so you stay safe and dry on every adventure.
Key Takeaways
- Choose the right tarp size: A tarp should extend at least 2–3 feet beyond your tent on all sides for full coverage.
- Use a ridge line or support pole: This creates a peak so water runs off instead of pooling in the middle.
- Angle the tarp for drainage: Always slope the tarp downward away from your tent to prevent water from dripping inside.
- Secure with strong guylines and stakes: Use high-quality ropes and durable stakes to anchor the tarp in windy conditions.
- Maintain airflow underneath: Leave space between the tarp and tent to reduce condensation and improve ventilation.
- Pick the right material: Polyethylene tarps are waterproof and affordable, while silnylon offers lightweight durability.
- Practice before you camp: Set up your tarp at home so you’re ready when bad weather hits.
📑 Table of Contents
Why You Should Put a Tarp Over Your Tent
You’ve packed your tent, sleeping bag, and snacks—but did you remember the tarp? Adding a tarp over your tent isn’t just about staying dry. It’s about protecting your investment, staying comfortable, and being prepared for anything nature throws your way.
A tarp acts like an umbrella for your tent. It shields the roof from rain, blocks harsh sunlight, and even helps reduce wind noise. Without one, your tent’s rainfly can wear out faster, and moisture can seep through seams during heavy downpours. Plus, a tarp gives you extra living space—perfect for storing gear or creating a shaded area to relax.
Whether you’re backpacking through the mountains or car camping at a festival, knowing the best way to put a tarp over a tent can make or break your trip. In this guide, we’ll walk you through everything you need to know—from choosing the right tarp to setting it up like a pro.
Choosing the Right Tarp for Your Tent
Not all tarps are created equal. The material, size, and shape all matter when it comes to effective coverage.
Visual guide about Best Way to Put a Tarp Over a Tent
Image source: i.ytimg.com
Material Matters
The most common tarp materials are polyethylene (poly), silnylon, and canvas. Poly tarps are budget-friendly and fully waterproof, making them great for casual campers. They’re heavy but tough. Silnylon is lighter and packs down small—ideal for backpackers who need to save weight. Canvas is breathable and durable but absorbs water if not treated, so it’s better for dry climates.
Size and Shape
Your tarp should be significantly larger than your tent. For a standard 2-person tent, a 10’ x 12’ tarp is a solid choice. It gives you enough overhang to direct rain away from your shelter. Square and rectangular tarps are easiest to set up, but diamond-shaped tarps offer more versatile pitching options if you’re short on trees or poles.
Color and Reflectivity
Light-colored tarps reflect sunlight and keep your tent cooler in summer. Dark tarps absorb heat—great for chilly mornings but not ideal in hot weather. If you’re camping in snowy conditions, a white tarp can blend in and reduce glare.
Best Way to Put a Tarp Over a Tent: Step-by-Step Setup
Now that you’ve got the right tarp, let’s talk about how to put it over your tent the right way. The goal is simple: keep water out, let air in, and stay secure in the wind.
1. Find the Right Location
Before you pitch your tent, look for a flat, dry spot with good drainage. Avoid low areas where water might pool. If you’re using trees, make sure they’re sturdy and spaced far enough apart to support a ridge line—about 15 to 20 feet is ideal.
2. Set Up Your Tent First
Always pitch your tent before adding the tarp. This ensures the tarp covers the entire shelter and doesn’t interfere with setup. Once your tent is up, you can position the tarp directly above it.
3. Create a Ridge Line (If Using Trees)
If you have two trees, tie a strong paracord or ridgeline between them at about 6–7 feet high. Use a taut-line hitch or bowline knot for easy adjustment. This line will support the peak of your tarp and prevent sagging.
4. Drape the Tarp Over the Ridge Line
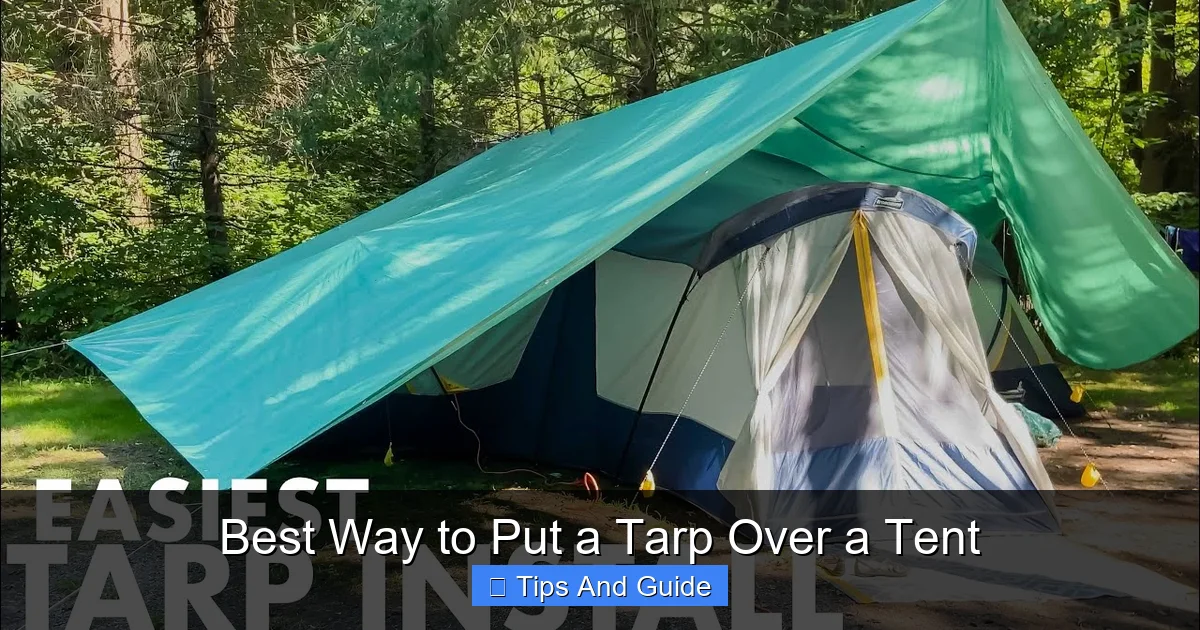
Lay the tarp over the ridge line so it forms a peak in the middle. The sides should hang down evenly. Make sure the tarp extends at least 2 feet beyond the front and back of your tent, and 3 feet on the sides. This overhang is crucial for directing rain away from your shelter.
5. Angle for Water Runoff
Never let your tarp lie flat. Always create a slope so water runs off the sides. The front and back should be lower than the center peak. If water pools in the middle, it can weigh down the tarp and even collapse onto your tent.
6. Secure the Corners with Guylines
Use guylines (ropes) tied to each corner of the tarp and anchored to the ground with stakes. Pull each line tight to keep the tarp taut. In windy conditions, add extra lines to the sides for stability. Use Y-stakes or sand anchors if you’re on soft ground.
7. Leave Space for Ventilation
Don’t let the tarp touch your tent. Keep at least 6–12 inches of space between the two. This airflow reduces condensation inside your tent and prevents moisture buildup. It also helps regulate temperature, keeping you cooler in summer and warmer in winter.
Alternative Setups Without Trees
Not every campsite has trees. That’s okay! You can still use a tarp effectively with a few creative solutions.
Using Tent Poles or Trekking Poles
If you don’t have trees, use your tent poles or trekking poles to create a support structure. Set up two poles vertically at each end of your tent, then drape the tarp over them like an A-frame. Secure the corners with guylines and stakes. This method works great in open fields or beaches.
Freestanding Tarp with a Center Pole
For a simpler setup, use a single center pole to hold up the middle of the tarp. This creates a lean-to style shelter that covers one side of your tent. It’s less coverage than an A-frame but still protects from rain and sun. You can even angle it to block wind from a specific direction.
Using Rocks or Logs as Anchors
In a pinch, weigh down your tarp corners with rocks, logs, or even your backpack. This isn’t as secure as stakes, but it works in a emergency. Just make sure the tarp is still angled correctly so water doesn’t collect.
For more detailed instructions on setting up a tarp without trees, check out our guide on how to put a tarp over a tent without trees.
Common Mistakes to Avoid
Even experienced campers make tarp mistakes. Here’s what to watch out for.
Sagging or Pooling Water
A sagging tarp is a disaster waiting to happen. If the center dips, rainwater will collect and eventually drip onto your tent—or worse, collapse the whole setup. Always keep the tarp taut and angled.
Tarp Too Small
Using a tarp that’s just the size of your tent is a big no-no. You need overhang to protect the sides and vestibules. A small tarp leaves your gear exposed and defeats the purpose.
Blocking All Ventilation
Some campers wrap their tarp too tightly around the tent, thinking it’s more secure. But this traps moisture and causes condensation inside. Always leave gaps for airflow.
Ignoring Wind Direction
Set up your tarp so the lowest edge faces away from the wind. This prevents rain from blowing under the tarp and into your tent. If you’re unsure, observe the weather before pitching.
Using Weak Stakes
Cheap plastic stakes won’t hold in strong winds. Invest in aluminum or steel stakes, or use natural anchors like logs and rocks when needed.
Tips for Different Weather Conditions
Your tarp setup should change depending on the weather. Here’s how to adapt.
Rainy Weather
In heavy rain, maximize coverage and slope. Use a larger tarp and pitch it low to the ground on the windward side. This creates a windbreak and keeps rain out. Make sure all seams are tight and guylines are secure.
Sunny or Hot Weather
In summer, raise the tarp higher to allow more airflow. Use a light-colored tarp to reflect sunlight and keep your tent cool. You can even angle one side up to create shade without full coverage.
Windy Conditions
In high winds, lower the tarp and add extra guylines. Use a diamond or hexagonal tarp for better wind resistance. Avoid tall, rigid structures that can catch the wind like a sail.
Cold or Snowy Weather
In winter, a tarp can help block wind and trap heat. Pitch it close to the tent but still allow ventilation to prevent condensation. Clear snow from the tarp regularly to avoid collapse.
For cold-weather camping tips, including how to stay warm, read our guide on the best way to keep warm in a tent.
Maintaining and Storing Your Tarp
A good tarp can last years if you take care of it. After each trip, shake off dirt and debris, then let it dry completely before folding. Never store a wet tarp—it can grow mold and weaken the material.
Fold your tarp neatly to avoid creases that can lead to tears. Store it in a breathable bag, not a plastic one, to prevent moisture buildup. Inspect it before each trip for holes or frayed edges, and patch any damage with tarp tape or seam sealer.
Conclusion
Putting a tarp over your tent doesn’t have to be complicated. With the right size, setup, and a little practice, you can create a weatherproof shelter that keeps you dry, comfortable, and confident on any adventure. The best way to put a tarp over a tent is all about preparation, proper angling, and smart anchoring.
Whether you’re braving a thunderstorm or escaping the summer heat, a well-placed tarp makes all the difference. So next time you head out, don’t forget this essential piece of gear. Your tent—and your peace of mind—will thank you.
For more camping tips, including how to keep your tent cool in summer, visit our guide on the best way to keep cool in a tent.
Frequently Asked Questions
Should the tarp touch the tent?
No, the tarp should never touch the tent. Leave at least 6–12 inches of space to allow airflow and reduce condensation inside your shelter.
Can I use a tarp instead of a rainfly?
While a tarp can provide rain protection, it’s not a full replacement for a rainfly. Use both for maximum coverage, especially in heavy rain or wind.
What’s the best knot for tying a tarp?
The taut-line hitch is ideal because it’s adjustable and holds well under tension. The bowline is also great for creating secure loops around trees or poles.
How do I keep my tarp from flapping in the wind?
Use extra guylines and anchor them firmly to the ground. Lower the tarp height and avoid loose edges that can catch the wind.
Can I use a tarp in snowy conditions?
Yes, but make sure it’s pitched to shed snow and inspected regularly. Clear buildup to prevent collapse and maintain ventilation.
Do I need a tarp if my tent has a rainfly?
Yes! A rainfly protects the tent, but a tarp adds an extra layer of defense, extends the life of your tent, and provides additional covered space for gear.